The last few months I have had the great opportunity to work with the javascript Canvas api a lot. I love it. Anyways, I wanted to share my experience and also share the 7 things I found stood out in this experience as they relate to the three things I love most which are coding, music, and design. The three core subjects this site deals with. This is not a tutorial, however if there is any topic you guys would like me to cover please let me know.
1- I love the AMD pattern (Require.js).
- I remember one of the first projects I worked in at one of the places I worked at was written using Require.js. I also remember thinking something along the lines of “Ughh this syntax looks like the code is throwing up.” Like everything, however, through more exposure you learn that people chose the technologies they chose for good reason. Playing with AMD a lot more, I now really appreciate it, and love it. I used it to make various cool Canvas modules that allowed me to add lots of functionality without taxing the browser.
- I love this pattern because it allows one to create complex applications in which each heavy component is only fetched as it is needed, and once fetched it is cached. If a component depends on other components which have already been fetched, then those will not be fetched again. Long story short this is awesome for big applications which load lots of unique components, as they wont tax the browser loading stuff they don’t need. A great example of this is the MarvelKids Scavenger Hunt functionality, where mini-games are accessible across 4 Marvelkids websites. These minigames share many of the same components. AMD in a way really is an organized form of script injection with architecture in mind.
- You can see the awesome Scavenger Hunt at http://www.marvelkids.com/ or the Avengers Recruits which has a feature using this pattern as well.
- Example of a common setup of the AMD pattern:
1
2
3
4
5
6
7
8
9
10
| define("mymodule", ["requiresThisOne", "andThisOne", "alsoThisOne"],
function(dependency1, dependency2, dependency3Class){
//Modules methods
function MyModule(){
//Some code
return new dependency3Class(dependency1, dependency2);
}
return MyModule;
}
); |
2- There are no DOM elements.
- First I thought I’d start with the most obvious. So in canvas you draw pixels, but there are no elements. I don’t often use prototype patterned javascript, but found it to be the greatest stuff ever for writing these games. I created my own Elements constructor which stores instance properties for coordinates, scaling, transformation, size and other basic things so I can keep track of where I am drawing `elements`. This enables collision detection and other techniques to allow the elements to interact together. Anyways I thought this to be really cool as you pretty much make the rules you need for whatever you are trying to build. Your game is your world.
- Example of how a basic constructor for this purpose could look like:
1
2
3
4
5
6
7
8
9
10
11
12
| function ElementClass(){//This could be an AMD module used by every element in your canvas project
this.init= function(texture,x,y){
this.texture = texture;
this.x = x;
this.y = y;
//the properties your engine tracks is up to you. Think of this similarly to the properties the DOM tracks for HTML elements
}
}
//Now in some module hopefully in a separate file we import the ElementClass
var myCharacter = new("a.png",10,10);
//There are so many ways to set this up |
3- Prototypes rule
- I have always appreciated adding methods to the prototype for the sake of memory, however, I really used mostly a variation of the module pattern known as the “Prototype revealing module pattern”. For making these games the prototype inheritance just allowed excellent extensibility.
- Example:
1
| Particle.context = this.context; //You can for example share your canvas context with all your components this way. |
4- Audio… OMG Audio
- I got to to merge my love for audio. I had to analyze the wav forms to allow extremely light seamless loops. If the crop and fades are not done right you can here clicks each time the track repeats in some browsers.
- I got to play with my knowledge of sound design. For example I remember using a multiband exciter to make three versions of the rocket whirling sound in the Rocket minigame for Scavenger Hunt. The faster motion sound would carry more high frequencies, which in turn would help create the illusion of more speed. The slower lower frequency sounds I added harmonics to, otherwise it was inaudible without good headphones or a subwoofer.
- Sorry, I think I got nerdy with this stuff. Blame the new audio API which I hope I get to use a lot.
- Example of two files, made from the same file. The second file has more harmonics and a more aggressive sound

5- Good architecture really matters
- I always care about architecture, but when you are generating lots of particle effects and creating pools with complex objects, you will really notice if you have bad architecture.
- Did I mention pools. Yes, you really have to manage your use of memory. Usually thought of an annoyance in this scenario it is awesome, and makes you feel in control of the engine you are building.
6- Blending modes
- In CSS there are many times designs are made with things like glows around a path, or shadows using the multiply blending mode in photoshop. Where in CSS you can get a similar effect, with canvas you are the master of the pixels and can get 100% exactly the same effect. You can use one of the predefined blending modes or write your own. Multiply blending mode for example is available as a predefined globalCompositeOperation but if it wasn’t you could simply multiply the rgb values of the two colors, and achieve the same result. All the blending modes are simply algorithms. With canvas making you the master of the pixels, you can create any blending mode you need.
- This article shows a lot of the available by default globalCompositeOperations https://developer.mozilla.org/en-US/docs/Web/API/CanvasRenderingContext2D/globalCompositeOperation
7- Its responsive
- Not really, but the canvas is an image and so it scales just like one. Only thing is your pointer events have to be made in such a way that the values are not absolute to a specific size.
- Example:
1
2
3
4
| canvas {//Do keep in mind you want your canvas width and height properties to be only as high as you need it. More pixels means more things to be processed and thus a bigger performance hit.
max-width: 100%;
height: auto;
} |
I am a mutiple part article
- Building your setup
- More on plugins, and core techniques coming later
It has been a long time since I wrote a blog post, as I have been super busy learning a lot of new technologies and engineering skills in the different world of Audio. Interestingly enough, in concept, processing audio is extremely similar to processing variables in an object oriented program. With that in mind, as I promised the meetup group I hosted, I want to dedicate this blog post to various things I learned in Audio engineering.
I have been playing music for as long as I have been programming, and in the last few years, I have experimented with more and more audio processing tricks, and I am not even talking about the lovely Javascript Audio API (A topic for a future blogpost perhaps). In this post series I want to share some of the more important things I learned in this journey, from building a basic studio setup, to upgrading its parts, as well as some core techniques for recording and processing the audio. The main and first thing I learned, is …this hobby can get expensive… but it is real fun.
Part I: Building your studio
A studio is not just a great room for working on the sound, but also the gear therein. Below I will list some of the core gear, and various pieces in the market at various price points, which I think can make up a great serious sounding studio.
DAW:
This ‘Digital Audio Workstation’ or in more mainstream words, “the studio software”, will be where you work recording, mixing and mastering your song. All DAWs do a great job. Choose one with great plugin support, or more importantly, one which supports the software you want to use.
Recommendations:
- Pro Tools: The industry standard. Expensive, but a tool which has great support, and lots of add ons available.
- Logic Pro X: My personal favorite. I love the workflow, and it supports all the plugins I like to use. Not only is it in my opinion the best DAW, but also a great one to use from the start, as it includes amazing tools to make pro level stuff, without the need to buy extra plugins.
Computer:
In a digital setup this is in a way the heart of the setup. I recommend as powerful a machine as you can afford. The reason for this is to be able to have a comfortable workflow without CPU overloads. If you have a large project, the overloads will drive you insane. That being said, there are tricks to tame this CPU usage.
Recommendations:
- I recommend one of the older Mac Pros with 8 or 12 cores… Most modern will make use of the extra cores. More cores gives you more room to process your audio. In Logic Pro X for example different tracks are distributed amongst different cores of the processor.
Converters/Interface:
Computers do not understand real (analog) audio waves, just as our ears do not understand the sound in digital format. The converters in the interfaces convert between these two signals. Audio interfaces have these converters (ADC & DAC) built in, though you can even buy them separately if desired. These conversions make it possible to record analog sound waves into the computer, and also make its playback back in analog through the speakers, possible.
Recommendations:
These highly depend on the budget, and the differences are small, but in my opinion can be worth it. That being said, however, I think great sound can be accomplished through technique even on the budget interfaces. Whatever the choice, the main thing in my opinion is to choose a unit that supports 24bit audio.
- Focusrite Scarlett: The Scarlett series are great entry units. These also include a preamp, which makes them very versatile.
- RME Babyface: Excellent value for lots of channels. Perhaps one of the best values there is.
- SPL Crimsom: SPL makes incredible stuff, and this is in my opinion the best interface under 1k. Excellent preamps built in, and great monitoring features and stuff.
- Apogee Symphony: My favorite converters/Interface, however do keep in mind as an interface it includes no preamps, and so it needs a separate preamp in order to drive microphones properly.
- Burl B2: Excellent ADC which adds a very nice character.
PREAMP:
Preamps are not necessary in my opinion, but they can enhance a great mic to sound its best. This is only required when using interfaces which have no preamp built in. These are not at all needed for example if recording electronic music where no mic’ing is needed.
Recommendations:
Though I said not necessary, with a good mic, I highly recommend a decent mic preamp, if not a few.
- Golden Age Project Pre 73: Excellent for the price. It is based on the Neve 1073; one of the most sought after mic preamps in the history of mic preamps, but unlike the preamp is based on, its actually pretty affordable. I’d recommend this one to anyone starting, and even any pros looking for a 1073 alternative. Its a bit dark sounding, but it has a great sound full of character.
- Warm Audio WA12: One I haven’t tried, but I hear great things about. It is also based on one of API’s great mic preamps, which is also one of the most sought after.
- A Designs Pacifica: Also sort of Neve 1073 sounding but with its own refined twist. I love this pre, but at this price, I have to recommend the Golden Age Project Pre 73.
MICROPHONES:
Microphones are not necessary for computer based music, but otherwise, recommending microphones is really hard since different microphones work in different contexts.
Recommendations:
- Shure SM58/SM57: Great all around Mics, and one of the best values in the market. For vocals alone, however I would recommend the Sennheiser e935 instead.
- Shure SM81: Using two of these makes awesome stereo recordings.
- Rode K2: My favorite mic of them all. A great value after a tube change. I thought the telefunken brand tubes suit it really well.
- Rode Classic II: Possibly, my new favorite mic.
- Royer 121: Not the most versatile mic in my opinion, but one of the best to have for recording guitars.
- Neuman U87: Industry standard mic. I don’t like this mic very much, but thought to list it as it is the industry standard mic, and it is a sound everybody hears most often in the radio.
MONITORS:
WHAT GOOD IS ALL OF THE GEAR ABOVE if you cannot hear things properly. Good monitors are in my opinion the most important tool.
Recommendations:
- Focal Alpha 50: Never tried these, but I hear great things. I am a bit biased about Focal. Their stuff always sounds the best for the price.
- Yamaha HS8: I could see myself making great mixes on these
- Focal CMS65: Mixing on these is a pleasure… It is what I use currently. I do like the higher end Focals, but these are an excellent sweet spot in value.
- Avantone Mixcubes: These make a great set of secondary monitors. These can help you fix your mix for different playback settings.
ACOUSTIC TREATMENT:
EXTREMELY IMPORTANT. again…WHAT GOOD IS ALL THE GEAR ABOVE if you cannot hear things properly. Proper acoustic treatment is a must.
Recommendations:
- GIK Acoustics: These are made up of very good quality materials, so they can truly help manipulate and tame and overall balance the acoustics in just about any room. Probably the best value for any ready made room treatment kits.
- Aurallex: Thse are also very good and less intrusive, though, these are quite a bit less effective than the GIK room kits, as foam is not exactly a replacement for fiber glass in terms of controlling low frequencies.
- DIY: My top recommendation is to buy some Owens Corning 703 and build some of these panels yourself. You will save a ton of money. And these will still be using proper acoustic treatment fiberglass. Just be cautious, in building these, as fibreglass is toxic.
In parts one and two of “Ajaxifying the web, the easy way” I spoke about moving click actions into the browser history. This allows for a ton of flexibility as well as code reduction, in modern javascript applications. In this the third and last part of our tutorial, I am going to cover caching. This is my opinion the icing on the cake, and what makes the script we are building really awesome. The filtering mechanism found at marvel’s new website sections for example makes heavy use of the caching ideas I will explain in this tutorial. Caching is beneficial both in terms of bandwidth as well as user experience.
As we add more features our js gets more complex. Programming design patterns now become more important.
- Before we can proceed to the implementation of our caching machanism lets first cover the deferred events design pattern which is handy for a task such as this. Knowing how to write this pattern from scratch is not required, but here is a link to more information for those of you who may be curious about it.
-
So the idea behind deferring events is that we can have asynchronous actions such as ajax, timeouts and yet force them to run in a predictable order. As you saw before we had to include the code that runs after the ajax request inside the function callbacks named success and error. Now that our logic is going to become slightly more complex, we will want more control than just those two function callbacks, and this is why this design pattern is important to understand. To start lets convert our previous ajax call to use the deferred pattern using jQuery.
1
2
3
4
5
6
7
8
9
10
11
12
13
14
15
16
17
18
19
20
21
22
23
24
25
26
27
28
29
30
31
32
33
34
35
36
37
38
39
40
41
42
43
44
45
46
47
48
49
50
| fetchData(hashContent){
//I moved the variables for ajax call here
var scriptName = hashContent.mainValue;//This is passed to the url request in our ajax call
var myParameters = hashContent.parameters;//This is passed as the parameters in our ajax call
//Here is the same ajax call we had previously, but you can see its written differently.
//Instead of success and error, we have two functions inside the .then method
return $.ajax({
url : '/location/of/my/ajax/scripts/'+scriptName+'.php',
dataType : 'json',//Whatever data type the calls are making
data : myParameters
}).then(function(response){//Same as success function
//WE CAN NOW CACHE THE RESPONSE BEFORE RETURNING IT
return response;
},function(err){//Same as error function
//We need to handle what happens on every error
return err;
});
}
doSomethingAccordingToHashValue(hashContent){
console.log(hashContent);//View the object returned by our tool
//Ajax call moved to a fetchData function, it now uses $.when, and $.then syntax in jquery for doing deferreds with ease
fetchData(hashContent);
//Here is the old ajax call for reference.
/*
$.ajax({
url : '/location/of/my/ajax/scripts/'+scriptName+'.php',
dataType : 'json',
data : myParameters,
success : function(response){
//We could pass this to a templating engine, or a template generating script.
//What you do with the data is up to you
},
error : function(response){
//We need to handle what happens on every error
}
});
*/
}
window.addEventListener('hashchange',function(){
//Triggered when hash in url is changed changed.
//You may want to use a library like jquery to listen for the hash change to support older versions of IE
var hashContents = getHashContents();
doSomethingAccordingToHashValue(hashContents);
}); |
As can be seen above not much was changed from our last piece of code which we wrote in Part II of the tutorial. The only change was some small refactoring, and the application of the deferred pattern to our ajax call using jQuery’s then method. This allows us to do do things with our data before we receive it presenting a perfect place for us to cache the response. This is extremely useful as it allows us to write a function in such a way that it either gets and caches the data, or just gets us the cached data. There are applications for this technique far beyond the scope of this tutorial.
Now that we understand deferring using jQuery’s then method, lets actually take this to the next level and add caching.
- We will be adding a single level of caching for our successful ajax responses, though once you are comfortable with this, the same idea may be used to cache errors based on their error code, while selective keeping some uncached (intermittent connection difficulties for example are best not cached).
-
1
2
3
4
5
6
7
8
9
10
11
12
13
14
15
16
17
18
19
20
21
22
23
24
25
26
27
| _cache = {};//We will cache things here
fetchData(hashContent){
var scriptName = hashContent.mainValue;//This is passed to the url request in our ajax call
var myParameters = hashContent.parameters;//This is passed as the parameters in our ajax call
//Lets make a cacheKey.
//You can think of these keys as if they are the names for the drawers in which to store our request's responses.
//We will use the url of the request as our key
var requestUrl = '/location/of/my/ajax/scripts/'+scriptName+'.php',
_cacheKey = decodeURIComponent(requestUrl);//Make sure to format properly for object key
if(_cacheKey in _cache && !$.isEmptyObject(_cache[_cacheKey]) ){//Lets check it is in cache and that it has data
return _cache[requestUrl];
else {//Else get and cache this data and then return this data to us, so we can do something.
return $.ajax({
url : requestUrl,
dataType : 'json',
data : myParameters
}).then(function(response){//Same as success function
_cache[_cacheKey] = response;//Here we are caching the response in our cache variable
return response;
},function(err){//Same as error function
//We need to handle what happens on every error
return err;
});
}
} |
As you can see above we added a new variable called _cache. This variable is an object and is where we are storing every response. For our code to be able to know where to find its data within the cache, we then used the requestUrl as our cacheKey. With this setup we call fetchData to make ajax requests while having it optimize all these requests with proper caching on the client side. Using localStorage for our _cache we can even take this to the next level giving us a persistent cache (More on this near the end of the article)
-
Another handy method is the $.when method. It allows us to wait for multiple asynchronous functions in one shot, before applying our magic. Lets apply this
-
1
2
3
4
5
6
7
8
9
10
11
12
13
| doSomethingAccordingToHashValue(hashContent){
console.log(hashContent);//View the object returned by our tool
//Using &.when to give us extra flexibility
$.when(fetchData(hashContent)).then(function(response){
//We could pass response to a templating engine, or a template generating script.
//We could do anything with this response
//All our ajax responses will get cached, making them faster when called a second time
//A common use is to add content to a page, or to create "Mobile" one page websites where the page contents animate.
},function(err){
//Handle errors
});
} |
-
Bringing it all together into one awesome script
-
1
2
3
4
5
6
7
8
9
10
11
12
13
14
15
16
17
18
19
20
21
22
23
24
25
26
27
28
29
30
31
32
33
34
35
36
37
38
39
40
41
42
43
44
45
46
47
48
49
| _cache = {};//We will cache things here
fetchData(hashContent){
var scriptName = hashContent.mainValue;//This is passed to the url request in our ajax call
var myParameters = hashContent.parameters;//This is passed as the parameters in our ajax call
//Lets make a cacheKey.
//You may think of these keys as the drawers where we store/cache each of the requests' responses.
//We will use the url of the request as our key
var requestUrl = '/location/of/my/ajax/scripts/'+scriptName+'.php',
_cacheKey = decodeURIComponent(requestUrl);//Make sure to format properly for object key
if(_cacheKey in _cache && !$.isEmptyObject(_cache[_cacheKey]) ){//Lets check it is in cache and that it has data
return _cache[requestUrl];
else {//Else get and cache this data and then return this data to us, so we can do something.
return $.ajax({
url : requestUrl,
dataType : 'json',
data : myParameters
}).then(function(response){//Same as success function
_cache[_cacheKey] = response;//Here we are caching the response in our cache variable
return response;
},function(err){//Same as error function
//We need to handle what happens on every error
return err;
});
}
}
doSomethingAccordingToHashValue(hashContent){
console.log(hashContent);//View the object returned by our tool
//Using &.when to give us extra flexibility
$.when(fetchData(hashContent)).then(function(response){
//We could pass response to a templating engine, or a template generating script.
//We could do anything with this response
//All our ajax responses will get cached, making them faster when called a second time
//A common use is to add content to a page, or to create "Mobile" one page websites where the page contents animate.
},function(err){
//Handle errors
});
}
window.addEventListener('hashchange',function(){
//Triggered when hash in url is changed changed.
//You may want to use a library like jquery to listen for the hash change to support older versions of IE
var hashContents = getHashContents();
doSomethingAccordingToHashValue(hashContents);
}); |
Putting together all the pieces we now have three different components working together, yet decoupled enough to use separately. We have our hashchange event to listen to whenever there is a hashchange events. We have our doSomethingAccordingToHashValue function which can serve as our router. At the moment the only route is to our third component which we named fetchData. This component will fetch data from the server or from cache if it has already fetched it from the server.
-
So we covered caching in an object, but what if we prefer localStorage.
-
We can certainly use localStorage for the same purpose. Instead of storing data in the _cache variable we can store it directly in localStorage. With that said, it is important to know the limitations of localStorage. One of this limitations is the fact that it stores data persistently which although wonderful makes it unsuitable for some scenarios. The other limitation is it can only store simple data, so it will not work for objects, or arrays, though I have a solution to that. I wrote a script to allow easy storage and retrieval for all sorts of data in localStorage. The script is called truStorage and can be found at https://github.com/andresgallo/truStorage. I have two versions of the script, with a tutorial on using them at github. One version is basic, and the other one allows using javascript modifiers as well.
We have now built a trio of components to make certain ajax tasks easier to maintain, and reuse. With these components in place, logic to add cache expiration, and other bells and whistles can be added to create a really badass routing framework as well as an endless amount of other applications. I hope this tutorial has been helpful, and look forward to seeing what you all build using these ideas. In the future I will write about my favorite design patterns which will help make complex scripts even simpler maintain, and reuse.
In part one of “Ajaxifying the web, the easy way” I placed much emphasis on how the url can be used to run your javascript. We are going to push the idea further by allowing our links to take parameters. In PHP, Node.js, ASP.NET and in just about any backend technology, the use of parameters is common for retrieving content. I also mentioned in the previous article that it is important to simulate how content is retrieved without AJAX. The reason for this is because it will become easier to create highly reusable scripts if you follow this idea, furthermore it will be easier to create versions of your content which don’t rely on javascript (as it is kind of what we are supposed to be simulating after all). So lets start creating…
2.Create a tool to help handle more complex ajax requests through your URLs. This technique can also be used with the newer but less supported pushState API, instead of using window.location.hash
- In the previous article we used javascript native window‘s object property, location.hash, to find out the hash url currently active. This time we are instead gonna call a wrapper function which contains window.location.hash.
-
I highly recommend wrapping code that you intend to enhance in every javascript project. In this case, by wrapping window.location.hash in a function, we will be able to analyze the returned value and parse it in any way we wish, to return something even more useful. This means for example that we can have urls such as “http://mydomain.com/#myRequestName/parameter1=value/parameter2=value2” translated into an object where the key or main value is “myRequestName” and its parameters are “parameter1,” and “parameter2.” If you are wondering how this will work we are pretty much going to cut our hash value into pieces and then extract these pieces using a couple of basic javascript methods.
1
| <a href="http://www.domain.com/#bio/name=Andres/getContactInfo=true/">Andres </a> |
1
2
3
4
5
6
7
8
9
10
11
12
13
14
15
16
17
| doSomethingAccordingToHashValue(hashContent){
console.log(hashContent);//View the content returned by our tool
}
window.addEventListener('hashchange',function(){
//Triggered when hash changed.
//You may want to use a library like jquery to listen for the hash change to support older versions of IE
//var valueInHash = window.location.hash;
//If above link was to be clicked window.location.hash would return
'http://www.domain.com/#bio/name=Andres/getContactInfo=true/'
var hashContents = getHashContents();//Our new wrapper to replace window.location.hash
//At this point the getHashContents() won't return anything since we have yet to create the function
doSomethingAccordingToHashValue(hashContents);
}); |
Not much above has changed from our code in part I of the tutorial. As you can see the only things we have really changed are the link which now has a unique format to allow us to pass parameters, and our use of window.location.hash which has been commented out and replaced by the function getHashContents().
So now with our new function wrapper getHashContents() we need to create this function and its functionality. This will be a core tool for what we intend to do ultimately.
- a. We mentioned the wrapper will let us extend functionality with ease. So lets start by allowing the function to not just grab the window.location.hash, but to also allow us to pass any url in the same format to it. This will make this function work as our special url decoder, whether the urls come from the url bar or whether we pass our own.
-
1
2
3
4
5
6
7
8
9
10
11
12
13
| /*Our function with a parameter to allow us to pass url strings if and when needed */
function getHashContents(hashString){
if(typeof hashString === "undefined")hashString = window.location.hash;
//The above if statement will check if we are passing a string otherwise it will just go ahead and get the string from the url bar instead(the typeof keyword is very useful by the way)
hashString = hashString.substr(1);
//Using substr above we remove the "#" symbol from the returned string as it serves no purpose for us
console.log(hashString)
return hashString;
//If the url is http://www.domain.com/#bio/name=Andres/getContactInfo=true/ this will return bio/name=Andres/getContactInfo=true/
//Our tool is obviously not complete, but getting closer
} |
-
b. Lets separate our main value/key/request name, from its parameters. Lets grab that knife and begin splitting.
-
1
2
3
4
5
6
7
8
9
10
11
12
13
14
15
16
17
18
| function getHashContents(hashString){
if(typeof hashString === "undefined")hashString = window.location.hash;
hashString = hashString.substr(1);
/*Comments for the above code removed to keep explanations concise. Modifications added are below*/
//At this point our hashString is now bio/name=Andres/getContactInfo=true/
hashStringArr = hashString.split('/');
//In our hashString value you can see that only "/" separates our main value parameters, so we will cut these into an array using javascript's split method.
console.log(hashStringArr);//This time we are outputting hashStringArr instead to the console
//return hashString;
return hashStringArr;
//If the url is http://www.domain.com/#bio/name=Andres/getContactInfo=true/ this will return the split array ['bio','name=Andres','getContactInfo=true']
//Once again our tool is obviously not complete, but getting closer
} |
-
c. Lets keep cutting and rearranging so our main value is truly separate from its parameters.
-
1
2
3
4
5
6
7
8
9
10
11
12
13
14
15
16
17
18
19
20
21
22
23
24
25
26
27
28
29
30
31
32
33
34
35
36
37
| function getHashContents(hashString){
if(typeof hashString === "undefined")hashString = window.location.hash;
hashString = hashString.substr(1);
//Comments for previous code have been removed to keep explanations concise.
//At this point our hashString is now bio/name=Andres/getContactInfo=true/
/*New modifications added are below*/
hashStringArr = hashString.split('/');
//Our hashStringArr is ['bio','name=Andres','getContactInfo=true'] so lets keep processing it.
lnk = hashStringArr.shift();
//The first value in the hashStringArr is our main value
//Lets use unshift to get this, the first value
params = hashStringArr.splice(0,hashStringArr.length);
//We now use hashStringArr.length to know the amount of values we need to splice through.
//Params now does not include the main value which means we have separated our main value from its parameters
console.log({
lnk : lnk,
params : params
});
//This time we are returning an object to the console.
//Now our tool as you can see is coming closer to life, however the params are still in a format that is not very useful.
return {
lnk : lnk,
params : params
}
//Since the function returns an object we can use it as a tool to this way
//getHashContents().lnk or getHashContents().params
//But as mentioned in the comment above getting the params in this format is not very useful.
//The goal is to be able to use the params like getHashContents().params.name to get the parameter.
//Our parameters need to be an associative array, (object in javascript) to be truly versatile.
} |
-
d. Using the same technique we have already used lets makes those parameters useful. We will loop through them and make those into objects.
-
1
2
3
4
5
6
7
8
9
10
11
12
13
14
15
16
17
18
19
20
21
22
23
24
25
26
27
28
29
30
31
32
33
34
35
36
37
38
39
40
41
42
43
44
45
| function getHashContents(hashString){
if(typeof hashString === "undefined")hashString = window.location.hash;
hashString = hashString.substr(1);
//Comments for previous code have been removed to keep explanations concise. Modifications added are below
//At this point our hashString is now bio/name=Andres/getContactInfo=true/
hashStringArr = hashString.split('/');
//Our hashStringArr is ['bio','name=Andres','getContactInfo=true'] so lets keep processing it.
lnk = hashStringArr.shift();
params = hashStringArr.splice(0,hashStringArr.length);
//Our params are ['name=Andres','getContactInfo=true'];
/*New modifications added below**/
var pair= {};
//The pair object is going to be our object container for our parameters.
var paramsLn = params.length;//Stores count of how many parameters we have
if(paramsLn > 0){//If we have parameters then lets fill our pair object with them
for(var i = 0;i<paramsLn;i++){//Lets loop through our params array items
var keyVal = params[i].split('=');//Just like we split our url lets split the params values based on the "=" sign.
//For example in the array value "name=Andres" we will get the array ['name','Andres']. In that array then keyVal[0] is 'name', and keyVal[1] is 'Andres'
pair[keyVal[0]] = keyVal[1];//Here we assign a new property to our pair object
}
}
/*By this point we now have have all the data we need and can return an object with all the right data*/
return {
mainValue : lnk,
parameters : pair
}
/*The object returned above would then be the same as
{
mainValue : 'bio',
parameters : {
name : 'Andres',
getContactInfo : 'true'
}
}
*/
} |
-
e. We have now completed our tool for analyzing our links. We can now use it on our Ajax calls.
-
1
2
3
4
5
6
7
8
9
10
11
12
13
14
15
16
17
18
19
20
21
22
23
24
25
| //Our completed tool
function getHashContents(hashString){
if(typeof hashString === "undefined")hashString = window.location.hash;
hashString = hashString.substr(1);
hashStringArr = hashString.split('/');
lnk = hashStringArr.shift();
params = hashStringArr.splice(0,hashStringArr.length);
var pair= {};
var paramsLn = params.length;//Stores count of how many parameters we have
if(paramsLn > 0){
for(var i = 0;i<paramsLn;i++){
var keyVal = params[i].split('=');
pair[keyVal[0]] = keyVal[1];
}
}
return {
mainValue : lnk,
parameters : pair
}
} |
With our tool ready, we could then have one small ajax script handling most if not all of our ajax based UI; a reason for which I find working this way scaleable. This works great for mobile apps where you want to create a native app like experience.
1
2
3
4
5
6
7
8
9
10
11
12
13
14
15
16
17
18
19
20
21
22
23
24
25
26
27
28
29
30
31
| doSomethingAccordingToHashValue(hashContent){
console.log(hashContent);//View the object returned by our tool
var scriptName = hashContent.mainValue;//This is passed to the url request in our ajax call
myParameters = hashContent.parameters;//This is passed as the parameters in our ajax call
/*This can be used to add a router script or to create an even more powerful framework
We will just add an ajax call using jQuery to provide an idea as to how this may
be used.
*/
$.ajax({
url : '/location/of/my/ajax/scripts/'+scriptName+'.php',
dataType : 'json',
data : myParameters,
success : function(response){
//We could pass this to a templating engine, or a template generating script.
//What you do with the data is up to you
},
error : function(response){
//We need to handle what happens on every error
}
});
}
window.addEventListener('hashchange',function(){
//Triggered when hash in url is changed changed.
//You may want to use a library like jquery to listen for the hash change to support older versions of IE
var hashContents = getHashContents();
doSomethingAccordingToHashValue(hashContents);
}); |
So we have just now created a very simple script that can help us handle complex tasks. I have used the techniques above to write a small framework which grabs smarty like templates from the server along with data. This framework caches these templates and uses them when the connection is lost, or updates them if there is a connection. With that said on the next part of our tutorial I will show you how to extend upon what we have created, to have our script cache every request. I won’t go in detail into writing a whole caching framework with all the bells and whistles as that would be much beyond the scope of what I can cover in a few articles, however, it will be knowledge that can be applied to creating such a framework as well as just about anything where self updating objects can be used…Ajax or not
I hope you all enjoyed this tutorial. If you missed part one, you may find it here
A hot trend I have been noticing lately is the ajaxifying of the web. This is especially the case for web applications which have complex frameworks at their core to aid in development. Something else I hade also noticed, however, is that this process is always explained as requiring complex frameworks though in theory, as well as in practice it can be very simple though not completely standard in process. With that said this tutorial aims to explain the mechanism behind this type of websites.
In this tutorial we will be using lots of vanilla javascript (non-framework js), to explain the mechanism, as well as jQuery, which makes asynchronous callbacks a lot easier to manage and explain. For this the first part of this tutorial, I will cover something I find to be core in ajaxifying a web application, and this is attaching javascript calls to your browser’s history. We won’t actually start with any ajax code till Pt II. On the code snippets I will leave comments for any tips, or things to be aware of. If I scare any of you with new terms, please read on…it is actually much simpler than I see it always being explained. I will explain it in a step by step manner.
1.Don’t trigger your page calls based on complex click event logic, but simulate how content is usually opened without Ajax
- This means that adding click events to all your ajax calls may not make sense when we can create something substantially more scaleable (In part II I will show how this can make your application more scaleable). This type of thinking will save you lots of time especially on complex dynamic web applications letting you plug in and add new pieces to your interface with less redundancy of code.
Lets start with a simple non ajax example. In this example we will have 10 links, and each linking to a popup with the bio of a different individual.
-
The most obvious approach for bringing the above example to life, would be to have 10 popups and 10 links on a page. Using javascript we would create a hook to have these links open the relevant popup when clicked.
1
2
3
4
5
6
7
8
9
10
11
12
13
| <a href="#" data-popOpener="Andres">Andres </a>
<!--would trigger a url change if clicked
url would become www.domain.com/#bioAndres-->
<a href="#" data-popOpener="James">James </a>
<a href="#" data-popOpener="Bond">Bond </a>
<!--We would have ten links like these right.
By the way, I highly recommend the use
of data custom attributes for passing data to your Javascript.
Keeps your code a ton more versatile. -->
<!--I also do NOT recommend the inline "onclick" attribute or inline
event handling as a whole, but for simplicities sake I've done just
that--> |
1
2
3
4
5
6
7
8
9
10
11
12
13
14
15
16
17
18
19
20
21
22
23
24
25
26
27
28
| function doSomethingAccordingToPopUpValue(popup){
//You can run anything here like for example a lightbox script to open a popup.
//For the sake of keeping our example simple I will just alert the popup's name
alert(popup);
}
//Using a library like jQuery you can do something like the script commented right below.
//Its also good for more browser support
/*
$('*[data-popOpener]').on('click',function(e){
e.preventDefault();//Prevent elements default behavior. You may not want links to go to their href attribute
var popUpName = this.getAttribute('data-popOpener');
doSomethingAccordingToPopUpValue(popUpName);
});
*/
//If using pure vanilla javascript and if IE support is no concern this is the new way to do the same
var popOpeners = document.querySelectorAll('*[data-popOpener]'),//Collect array of elements
popOpenersLn = popOpeners.length;//Optimizes looping through elements array
for(var i=0;i<popOpenersLn;i++){
var eachPopOpener = popOpeners[i];
eachPopOpener.addEventListener('click',function(e){
e.preventDefault();//Prevent elements default behavior. You may not want links to go to their href attribute
var popUpName = this.getAttribute('data-popOpener');
doSomethingAccordingToPopUpValue(popUpName);
});
} |
While as mentioned this is the most obvious approach, for many many cases, I’d avoid it as it is not versatile enough in some circumstances. What if you wanted to share a popup with someone by sending them a link? For this reason I recommend using url changes as the triggers of the popups, rather than using click events. This lets your links do the job automatically, you can share the popups since they are triggered by what is on the url, and more importantly your javascript calls get stored in the history as you navigate through them, which is very useful for some clever interfaces.
For this the first step, javascript provides us with a powerful tool many javascripters I know are not aware exists. This tool is the hashchange event, which allows javascript to detect when the url’s hash has been changed. It has to be a hash, as otherwise a change in the url would end up reloading our page. This is supported in all modern browsers, including IE 8 and 9. For IE7 support you can always use a variety of plugins. I like to use ben Alman’s hash change plugin for this sort of thing.
Below you can see a sample of some links of some links as well as the javascript required to listen for these changes in the url.
1
2
3
4
5
6
| <a href="#bioAndres">Andres </a>
<!--would trigger a url change if clicked
url would become www.domain.com/#bioAndres-->
<a href="#bioJames">James </a>
<a href="#bioBond">Bond </a> |
1
2
3
4
5
6
7
8
9
10
11
12
13
| function doSomethingAccordingToHashValue(hash){
//You can run anything here like for example a lightbox script to open a popup.
//For the sake of keeping our example simple I will just alert the hash value's name
alert(hash);
}
window.addEventListener('hashchange',function(){
//Triggered when hash changed.
//You may want to use a library like jquery to listen for the hash change to support older versions of IE
var valueInHash = window.location.hash;
//If above link was to be clicked this would be 'bioAndres'
doSomethingAccordingToHashValue('valueInHash'); //Runs function above
}); |
In the above example you can see standard hash links (recognizable by the “#” in the url the point to), and the barebones javascript which is the heard of our functionality. The ability to detect hash changes is great as we could theoretically detect and run custom scripts depending on the value of the hash link. Since these changes also are triggered and retriggered with the browser’s back and forth history buttons, many possibilities open up.
These links have some limitations but we can create a solution
There is a severe limitation in these hash links. You will immediately see this limitation when hooking up your hash link to an ajax script which could benefit from passing parameters to your server’s backend. In our example function called doSomethingAccordingToHashValue, I mentioned you can do just about anything. If you wanted to have a complex ajax call there, it would be awesome to be able to pass parameters right? What if instead of just 10 bios, you had a huge and unpredictable amount of bios, as well as a huge unpredictable amount of movies, all which you’d want to show in a popup. Now we need something more scaleable. Below is one possibility where having only two types of links will do. If you wanted you could even have only one link, and therefore only one piece of code handle every scenario based on the parameters passed.
1
2
3
4
5
6
7
8
9
10
11
12
13
14
| <a href="#bio/name=andres">Andres</a>
<!--would trigger a url change if clicked
url would become #bio/name=andres/anotherparameter=true-->
<!--we can write a tool so that on hash change this link calls an ajax script
and passed parameters to it-->
<!--with the tool we can have the link therefore do an ajax request to "http://domain.com/bio.php?name=andres"
and then in the javascript you can process whatever is returned into a cool interface design or something-->
<a href="#bio/name=james">James</a>
<a href="#bio/name=bond">Bond</a>
<!--Movie links-->
<a href="#movie/name=super_bad/
<a href="#movie/name=pianist/ |
The above sample means our links can let us do truly dynamic things. I will explain how to have our links pass parameters in my next article, and for those new to ajax, we will write a bit of ajax in the next part of this article. For the case of modern mobile applications, this means we can create native like web applications that easily wrap in PhoneGap, and truly feel native. In combination with css3 we can create complex interfaces, that animate their content which they get from the server creating a more fluid experience for the user. I thought the example of popups is good for analogy, however, the possibilities that become open, allow for new creative solutions to interface design.
I hope you all enjoy the article above and find much use in it. As usual I look forward to hearing your feedback and suggestions on this topic as well as any tricks you can share. Please feel free to contact me with any questions, or if something is perhaps not clearly explained.
A few months ago, I had mentioned the idea of writing a couple of Javascript articles/tutorials. This, being my first article on the series about this powerful language, will begin with an overview for those of you who are new to the subject, and will become more complex as I progress through this series.
What really is Javascript, and how does it differ from other languages?
Javascript is a client side language, which means it runs on the end user’s computer rather than on a remote computer/ server somewhere else. This is both cool and useful, as it allows developers and web designers to create a website which truly interacts with the user. A server side language like PHP or Ruby on the other hand instead interacts with the server, but not directly with you.
If you are wondering what it means to say that the server side language does not interact with you, this is the paragraph to read. Everytime you click a link, or a submit button, you have most likely noticed your browser stops to load a new page. This lag between the current page and the next, is called a server request. In this request your browser is speaking to the server, requesting it to send a new page. In fact, each page can have many extra server requests for any images, audio and anything else required to build and display the page you requested.
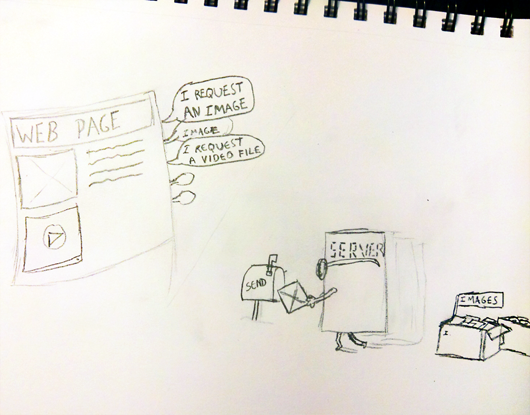
This is important to understand for the sake of optimizing your websites. As the server keeps receiving requests to “send image a, send image b, send image c…”, it will take the server time to send them, which makes up your page load time. While you could say you are interacting with the page, what really is happening is that your browser is interacting with the server.
The level of interaction between the user and a server side language is pretty much non-existent, however, this does not make server side languages useless. A lot of stuff also happens in the server which becomes obvious when thinking of a large scale website application. A website with thousands of users for example, does NOT store thousands of webpages (one for each user). Instead, it stores the user’s data separately and when a page is requested, it inserts the data into a template on the fly. This template is then the website you see on your browser. It is really nothing more than an html file that was generated on the fly.
Not running on the server, Javascript on its own is severely limited, but wonderful when used along server side languages. You can have video games running on your browser, and just about anything which requires (seemingly) latency free interaction. Things like drag and drop, touchscreen swiping and just about any modern techniques can be done manipulating that which you see on the screen in real time. Also, running on the user’s device you can program smart interfaces that can detect and respond to the user’s screen size, as well as other input devices such as the keyboard, mouse, touchscreen etc.M ost websites today don’t really exploit the possibilities of Javascript, but this is sure to change as smart and interactive devices such as tablets and smartphones become more and more popular.
I have focused on the capabilities Javascript brings for interactivity; however, its versatility goes far beyond that. In the last few years it has become great for optimizing websites. Used along server side technology, you can make server requests without the need to completely reload the page. If you have used facebook, or google, you have surely seen this. One example of this is google’s search engine, which while running on your machine interacts with the keys you type. This is how google provides you with suggestions before you have even finished typing the text. At each key you enter in google’s search engine, the webpage communicates with the server in the background so your page does not load. Once google’s server has analyzed the data Javascript has sent, it returns a list of words that are suitable suggestions. With this new data available on the client side, Javascript can grab that information and render it into html allowing you to see it in the form of google’s search suggestions. This technology of communication between server and javascript is called Ajax. Ajax used to be a scary technology to me, but as I began using it, it became obvious that it is actually rather simple to use, and extremely effective.
As I write more of these articles I will explain more on how to actually use these technologies. To get a better idea as to where I should start, comment or email me.
The last two months have been very busy reading and learning many new technologies as well as working on lots of cool stuff. Right now it’s a great time for the web with all sorts of cool stuff going on. So just like usual, I would like to share one of my previous projects with all of you.

As you all know, I always like to write about my designs, and don’t think I ever mentioned a non-profit project which I worked on a few months ago. This project was for Global Mental Health Initiatives; an organization which specializes in mitigating mental illness from poor countries. The nature of what they do, requires their website to be very versatile when it comes to text, yet intuitive enough to use as to not require the slightest amount of something as irrelevant as web coding on their end. This is something boring plain text files will do right, however, a website should of course be richer, cleaner, and more expressive all at the same time than any text file. So before even getting started with the website, a content management system would need to be setup, in such a way as to allow easy content editing, while also keeping typography both uniform and dynamic.
To create a solution, I decided to go with CMSMS as the content management system. Just as its name says it is a content management system made simple. Using a simple and versatile CMS, would allow me to setup a tool that would allow me to more fully control how the users add content to the website preventing any inconsistencies that may arise. Using CMSMS, I created a series of typographical elements (CSS classes in reality), to provide the users with some control, while keeping the core of the typography uniform. These typographical elements were structured to look slightly different depending on the module where they show up, to ensure there are some dynamics in the text. All the content manager needs to worry about is filling the textboxes with content. The textboxes work just like the WYSIWYG editors in wordpress, Joomla and many more, but there is one advantage and it’s the reason I chose cmsms. My custom made elements, can be selected from a dropdown, allowing content editors to make decisions based on the semantic names I gave these elements (wrappedAroundImage,subHead,emphasizeMe….) therefore promoting consistency across the website.
I have a love and hate relationship with uniformity however. Too much uniformity can make visuals seem overly plain and dull, and too little of it can make for a messy effect on the wrong hands. So before even starting to design I had a new problem to think about. Fortunatelly, cmsms allows me to setup the content management system so that multiple boxes in a page correspond to multiple areas of the website. This allows me to mimic the modules of Joomla, except it’s a hundred times easier for content editors to manipulate.


So with the heart of the website setup, the next step would be to design it. Locking the system into generating pretty uniform text, the overall framework or shell of the website needed to look rich and dynamic. I experimented a bit but one thing was for sure, vibrant but friendly colors, and lighting are a must; these characteristics would set the right tone to create an interesting visual welcoming users to read the content. The content should be legible and therefore away from any distractions. Though the image above looks colorful and friendly it needed to reflect the seriousness of the logo.

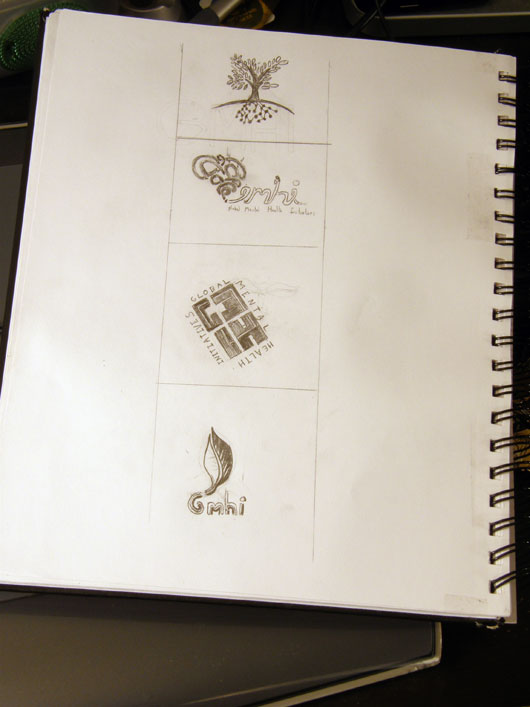

On the logo I tried a few approaches, but ended going for a minimalist and precise direction, just like the website was to become. I felt these would be very defining touches to express the importance of the work gmhi is doing for communities. As an organization it needed to look firm, but also soft around the edges as their aim is after all to help communities. Long story short, the logo as well as the website should show up as both friendly and clear both reasons for going with a logo type. The g was given a roundness to help minimize hard edges, and the i wrong in their typographical heights and design to fit along the rest of the letters in more unity.
And with all said, here is the new design. You can visit their website to see how the content is maintained as it changes.

You can visit Global Mental Health Initiative’s website at www.gmhi.org
Lately I have been working in multiple projects; a mobile app, a non-profit organization’s website (gmhi) which just went live, and lots of fun javascript. I love to stay busy, learning and doing as much web and design stuff as I can. One of the fun recent projects involved one of my favorite hobbies- playing guitar. Unlike most of my other posts, this post is just to share some educational music diagrams I designed.
About a year ago, I had designed 3 tabloid sized (11×17) posters with the diagrams for various scales.
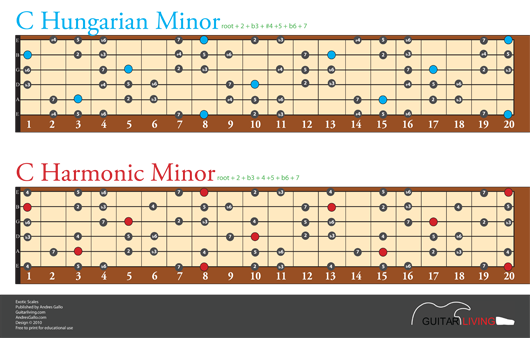
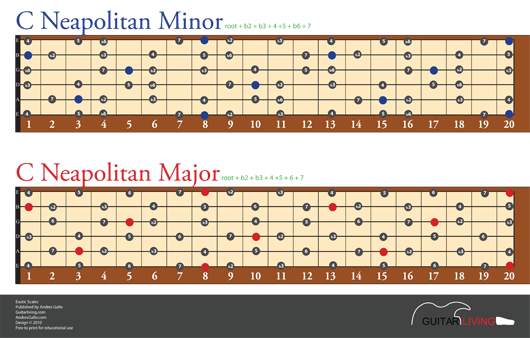
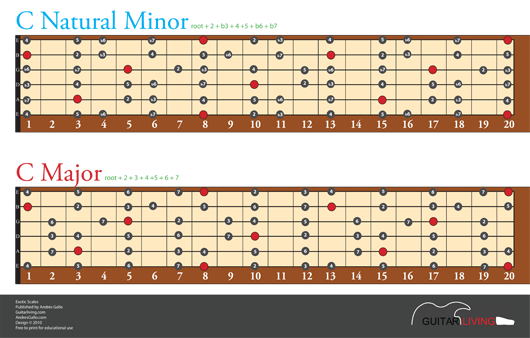
Over the weekend I created an extra diagram with 2 more scales, and here it is along with the previous diagrams for you guys to download or even print at any location that does tabloid size printing.
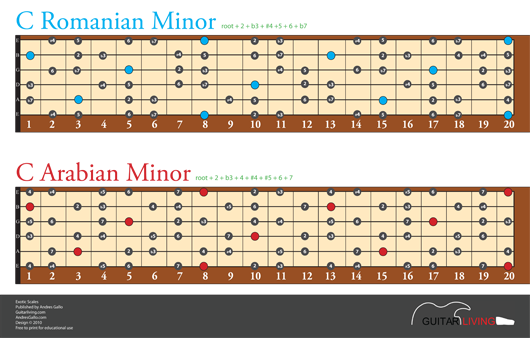
These diagrams are very useful for guitarists, guitar instructors and students as they provide a visual aid as to how the scales work in the fretboard. They also provide a visual of the relationships between the intervals of the scale.
Being a design oriented blog, I should mention the minimalistic design which mimics a guitar fretboard, and keeps the content clear. The big cleanly titles the scale we are viewing while the smaller text gives the user the formula or intervals needed to create such scale. This gives musicians the idea that even though the diagrams are in the key of c, the formula can be used to recreate the scale in just about any key. It looks quite nice and easy to use once printed.
Here is the link to download the scale diagram posters. Rock on!
By the way, I will start writing a javascript series starting the end of this month. Any suggestions for this series, or feedback is always welcome.
As promised, here is part 2, to the article “add custom content fields to Joomla.” Last monday we discussed the first aspect of adding custom content fields to Joomla which involved all of admin side steps. These steps included adding a field(s) to the administration’s add/ edit article pages, and connecting the new field(s) so that they write to our joomla database. In part two of the tutorial, I am now going to expand on what was covered last time so that we can actually output the information from our new fields.
For those of you who missed part one, you can find the link here.
Please don’t freak out, sections 1 through 4 are on part 1 hehe
Retrieving data from new fields for output
- 5. Begin by modifying the content component’s view. As this time will be modifying it on the front end, you will need to go to components\com_content\views\article\default.php
-
An override can be done instead of altering the original file. This is done in your site template where this override is to take place. You can follow the steps for overriding in part one of the tutorial. The only things that will be different are the paths. This time we are creating an override for components\com_content\views\article\default.php instead
- Near the end in the default.php file, we find the lines which output the data entered in the articles’ content field.
-
1
2
3
| <?php if ($params->get('access-view')):?>
<?php echo $this->item->text; ?>
<!-- item->text is the default textbox which will duplicate with our field name--> |
- Lets add our new field right before the default field.
-
1
2
| <?php echo $this->item->japaneseText; ?> <!-- notice I used japaneseText which I have been using for my textbox -->
<?php echo $this->item->text; ?> |
-
-
If you have other languages installed you can even display one or the other with using a conditional, which is easier to maintain in many circumstances than the built in method of managing languages.
1
2
3
4
5
| if(preg_match('/japan/', strtolower($lang->getName()))){
echo $this->item->japaneseText;
} else {
echo $this->item->text;
} |
- 6. Allow Joomla’s front end to read our new field from the database. For this we edit the model in components\com_content\models\article.php
- In this file there is a select statement that hooks up the fields for output. Add your new field with prefix ’a.’ In my case for example I add ‘a.japaneseText.’
-
1
2
3
| $query->select($this->getState(
'item.select', 'a.id, a.asset_id, a.title, a.alias, a.title_alias, a.introtext, a.fulltext, a.japaneseText,'
//notice at the end I added 'a.japaneseText' |
- 7. Do the same to the template at components\com_content\views\featured\tmpl\default_item.php, as well as to the model at components\com_content\models\article.php
- In the template echo the new field, and on the model add the field to the select statement just as we did on steps 5 and 6.
At this point you are ready to add content to your new fields.
In the xml file we edited on part one of the tutorial, there are other types of fields you can use. Check out some of the other available types of fields to see what else can be added
you can also change the type of input field you are adding. Take a look at other fields in that xml file to see some of the possibilities.
-
Just as the component was overridden modules can be overridden as well.
-
For example in the front end, we can override how the latest articles list outputs, by using the same name as in modules\mod_articles_latest\tmpl\default.php.
- We copy this once again into our template in the html folder
- Templates\ourFrontEndTemplate\html\mod_articles_latest\default.php in this case would be our override. We do not need any of the other files in the original module folder.
- In the case of the mod_articles_latest module, you can modify the output to be more dynamic, or to count the number of items you have and more.
-
Doing the overrides you may notice some index.html files which seem to have no purpose. It’s a good idea to copy these in every directory you create, as these are there for security reasons.
I look forward to hearing your feedback and suggestions on this topic as well as any tricks on web design.
Recently I had the chance to work with the latest version of Joomla in a multi-language project. Having used a custom made language tool before, I felt Joomla’s built in design was poor for handling content editing for multiple languages. Fortunately, however, the solution was simple. The solution is to modify the way the articles work so that we can have extra content fields, each corresponding to a different language. While I found instructions on modifying Joomla 1.5, there was little to no documentation on modifying 1.7 this way. Fortunatelly however, at least half of the process is very similar, furthermore, Joomla 1.7’s core code is organized enough that making any modifications feels more natural than it tends to be with other software. So this is how I got 1.7 to allow me to have extra fields. This will surely make Joomla a lot more flexible
So in this tutorial I will cover how to add new fields to your articles, how to link them to the database, and how to modify the output of your modules and components so that you can achieve the results desired.
Adding a custom field
- 1. Go to administrator\components\com_content\models\forms\article.xml
- In it you’ll find a list of field tags in xml. These are the fields that make the forms you see when you edit an article.
-
1
2
3
4
5
| <field name="articletext" type="editor" class="inputbox"
label="COM_CONTENT_FIELD_ARTICLETEXT_LABEL" description="COM_CONTENT_FIELD_ARTICLETEXT_DESC"
filter="ContentHelper::filterText" buttons="true" /> |
- You can copy and paste that, but make sure to change the name attribute to something else, preferably something which describes your textbox. Maybe you want to use it to be the text for a different language.
-
1
2
3
4
5
| <field name="japaneseText" type="editor" class="inputbox"
label="COM_CONTENT_FIELD_ARTICLETEXT_LABEL" description="COM_CONTENT_FIELD_ARTICLETEXT_DESC"
filter="ContentHelper::filterText" buttons="true" /> |
- In the example above I am creating a field which I will use to put Japanese text
- 2. Now that we added the fields to our admin model, lets add it to the view so we can see it on our admin Interface. For this, go to administrator\components\com_content\views\article\tmpl\edit.php (we can use these folder and file names for an override)
- You can write changes here or override them while keeping the original. To do an override we use the same folder names but place them in our administrator template.
- You can find out which admin template you are using by logging in to your joomla website, and going into extensions > template manager.
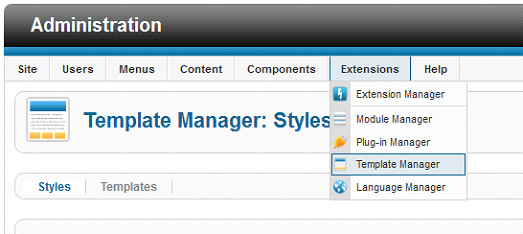
- Below the area on the above image, in the template manager screen you should see a list of all your templates, as well as an indicator for that which is being used as your administration template.
Overriding the template : Skip these steps if you will be making changes straight into the core components. Overriding, however is a much safer approach as you’ll keep your original should any changes arise.
* go to administrator\components\com_content\views\article\tmpl\edit.php and copy the edit.php file
*now go to administrator\templates\yourtemplate\html\
If the html folder indicated above does not exist then add it.
Also add the folders below if they are not there already
com_content\ article\edit.php (this is the php you copied from the components folder, and here you are overriding it. It’s the same as changing the original, but its good to keep the original intact in case the need to revert ever arises. )
- 3. Editing the Edit.php file
- In the edit.php file you will see these lines that output an input field called articletext.
-
1
2
3
4
| <div class="clr"></div>
<?php echo $this->form->getLabel('articletext'); ?>
<div class="clr"></div>
<?php echo $this->form->getInput('articletext'); ?> |
- If you look at the xml file in the first step you will see the field we copied had that same name. With that said you can also copy this same code, but instead of using articletext as the name, use the name of your new textbox.
-
1
2
3
4
5
6
7
8
9
10
11
| //Our new textbox
<div class="clr"></div>
<label>Article Text - Japanese Text</label>
<div class="clr"></div>
<?php echo $this->form->getInput('japaneseText'); ?>
//The default textbox
<div class="clr"></div>
<?php echo $this->form->getLabel('articletext'); ?>
<div class="clr"></div>
<?php echo $this->form->getInput('articletext'); ?> |
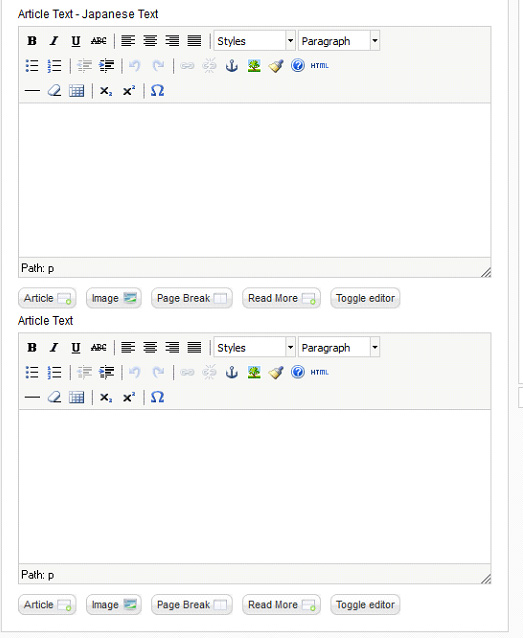
- I had called my textbox japaneseText, and you can see I copied the getInput code and used JapaneseText as the argument above. I am hardcoding the label in this case, as Article Text – Japanese Text
- Now we have a new textbox on the administration end. This is how it looks now when we go to add a new article.
- 4. Hooking up our new textbox with the database.
- Although the textbox now exists, it is not hooked up to the database. In your database, in your content table called yourPrefiX_content we need to add a new field with the same name you used for your textbox in the xml file (in my case japaneseText)
- You can add this new field through php my admin or using this command
-
1
| ALTER TABLE ` yourPrefiX_content ` ADD `japaneseText` VARCHAR( 255 ) NOT NULL; |
- You may use mediumText instead of varchar(255)
- If the command executed successfuly our new input field should now be writing to our database.
So this is all for the admin end. Next post this week I will write part 2 of “Add custom content fields to Joomla.” In part 2 I will cover how to output these textfields in your website, as well as some tricks for Joomla using some of the techniques covered in the two articles.
Edits (Some comments include additions many may find helpful) Edited
Alex commented on how to display the custom fields in the frontend submission form
- To display the custom fields in frontend submission form, do these above edits (1 to 3) in
- /components/com_content/models/forms/article.xml
- components/com_content/views/form/tmpl/edit.php (you may want to copy this file to your template.
I look forward to reading any questions or suggestions you may have


